You are on a deadline. You have two weeks to produce 500 more units to meet your customer’s expectations at a rate of 50 per day so you should be in good shape. Suddenly, you have a problem. Bolts are stretching and breaking on the assembly line. What do you do now?
Your checklist should look something like the following, in order:
- Verify that the correct torque settings are being used – 120Nm ok
- Verify the torque wrench – calibration ok
- Check fastener property class head marking – class 10.9 ok
- Check for any signs of lubrication which could have gotten into the threads or under the rotating bearing surface – ok
- Check the core hardness of the bolts – HRC 32-39 ok
- Consult your fastener supplier for a joint analysis
Real Life Assembly Solutions
This exact case happened to a Bossard engineer. After checking the screws to ensure that they met specifications for hardness, the obvious recommendation was to lower the torque. But by how much? How can we ensure enough clamp load to keep the joint tight?
In this case, the design engineer had determined a minimum clamp load requirement of 30kN for a safe joint. Since the recommended torque was causing the bolts to stretch, we performed a test to determine how much torque was necessary to tighten the joint.
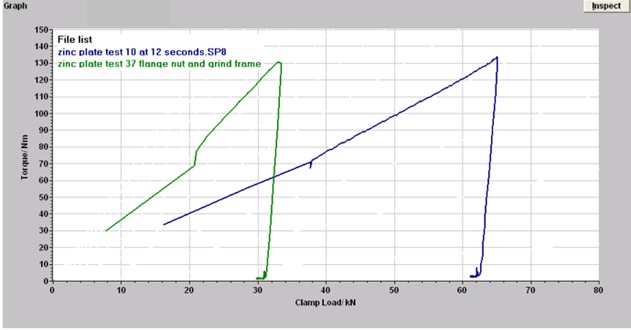
By performing a torque/tension test on the joint, we were able to determine that the painted surface under the flange nut had much lower friction than predicted. This caused much higher clamp loads using the recommended torque of 120Nm.
Graph comparing clamp load with a painted surface, and a bare steel surface:
Typical data from the joint analysis:
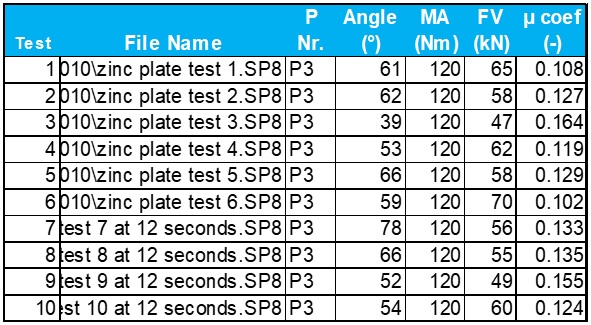
- MA = torque
- FV = clamp load
- µ coef = total coefficient of friction
More testing was necessary to determine at what torque yielding would occur. In the worst case, yielding occurred at 61kN clamp force, which is higher than the minimum 30kN requirement.
The joint analysis pointed out the issue and the recommendation was to lower the torque to 110Nm to stay above the minimum clamp load and below the yield point of the screws to avoid stretching and stopping the line. Problem solved!
If you find yourself in need of joint analysis, check out Bossard’s latest Assembly Technology Expert services, especially the Expert Test Services pillar, or by contacting us at ProvenProductivity@bossard.com.
Doug Jones
Applications Engineer
djones@bossard.com